Nokia 1280 speaker earpiece jumpers
earpiece 1280 not working
earpiece nokia 1280 problem
earpiece jumpers nokia 1280
Nokia 1280 earpiece ways
Nokia 1280 earpiece jumpers
Nokia 1280 earpiece solution
Nokia 1280 speaker earpiece jumpers
Nokia 1280 speaker earpiece ways
Nokia 1280 speaker earpiece solution
Nokia 1280 speaker earpiece jumpers
Nokia 1280 speaker earpiece problem
Nokia 1280 speaker earpiece not working
Nokia 1280 speaker working ok but earpiece not working solution
Nokia 1280 speaker working Ok but earpiece not working solution
Nokia 1280 earpiece speaker not working but loud speaker is good working solution first check the line and trace it
make jumpers
Nokia 1280 speaker earpiece jumpers
earpiece 1280 not working
earpiece nokia 1280 problem
earpiece jumpers nokia 1280
Nokia 1280 earpiece ways
Nokia 1280 earpiece jumpers
Nokia 1280 earpiece solution
Nokia 1280 speaker earpiece jumpers
Nokia 1280 speaker earpiece ways
Nokia 1280 speaker earpiece solution
Nokia 1280 speaker earpiece jumpers
Nokia 1280 speaker earpiece problem
Nokia 1280 speaker earpiece not working
Please Wait few seconds
DOWNLOAD DIAGRAM
Please Wait few seconds
DOWNLOAD DIAGRAM
[Custom Rom] Lewa OS for MT6582
Lewa OS with a new look and features. This Custom Rom for MTK6582 devices running with jellybean 4.2.2.
Rom info:
- Chipset: MTK6582
- Android Version: 4.2.2
Features:
- Lewa with new Look
- Odex Rom
- Not Rooted
- Smooth
- Nice UI
- Lewa Framework
- Online Theme support
- Good Audio quality
- Nice Ram performace
- GAAPS Added
Screenshot:


Before Install:
Full Backup of your current Stock Rom before flash.
Requirements:
- Rooted Phone
- CWM Recovery
Process:
Reboot to Recovery Mode >
A.Wipe data/factory reset
B.Wipe cache partition
C. Mount and storage >
1. Format data
2. Format system
3. Format cache
D. Advanced >
1. Wipe dalvik cache
Back to the Main Menu.
Select
Install zip from sdcard > Choose zip from sdcard
Select Rom zip file.
Installation will start. Wait until finish.
Then Reboot and Enjoy the new rom.
Credit:
Artisan Team
MTKcROM
MT6582 devices of Lenovo, Xolo, Huawei, ZTE, Symphony, Walton, Karbonn, Micromax Mobile and others MT6582 with 4.2.2 Need to port this rom.
Jellybean Rom for MT6582 Devices
Porting Guide:
Stock Rom (Original Rom of your device)
Port Rom (The Rom which you want to port for your device)
Step1. Delete Folders
Go to the Port Rom system folder and delete-
Folder delete:
system\etc\firmware
system\lib\hw
system\lib\drm
system\lib\modules
Step 2. Copy Files and Folders from Stock Rom to Port Rom
Go to Stock Rom folder, Copy folders and files and Paste and replace to the Port Rom.
Files and Folders to replace:
system\etc\firmware
system\etc\permissionssystem\etc\security
system\etc\wide-dhcpv6
system\etc\vold.fstab
system\etc\vold.fstab.nand
system\lib\hw
system\lib\drm
system\lib\drm
system\lib\modules
system\lib\soundfxsystem\lib\libaudio.primary.default.so
system\lib\libcamalgo.so
system\lib\libmhaldrv.so
system\lib\libcamera_client.so
system\lib\libcameracustom.so
system\lib\libcameraprofile.so
system\lib\libcameraservice.so
system\usr
system\vendor
Step 3. Edit Mount Point
Go to Port Rom META-INF\com\google\android open updater-script with Notepad++ change the mount point.
Find the line /dev/block/mmcblk0p and you will get the line like below.
format("ext4", "EMMC", "/dev/block/mmcblk0p5", "0", "/system");
mount("ext4", "EMMC", "/dev/block/mmcblk0p5", "/system");
mount("ext4", "EMMC", "/dev/block/mmcblk0p7", "/data");
Mount point I marked in red color 5 & 7 now change it as per your device mount point. (Do not need to change the whole line.) If your device mount point for system is 3 then make it 3 instead of 5. If your device mount point for data is 5 then make it 5 instead of 7. To know your device mount point run MTK Droid Root and Tools and connect your device. Then click Block Map.

Step 4. Port Kernel
Unpack stock boot.img and copy kernel then unpack port rom boot.img and paste and replace the stock kernel to custom rom kernel. Repack port boot.img. For more details follow Kernel Port Guide
Final Step: Make Rom zip file
Now select boot, logo, system and META-INF make it zip. It is now ready for flash.
N.B. : All the Things do it at your won Risk. I will not be responsible for any kind of Brick/Damage of your phone.
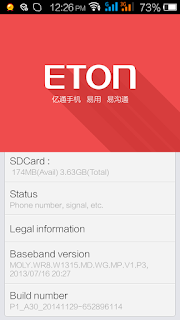
[Custom Rom] ETON P1 Rom for MTK6572 [4.2.2]
About Eton P1: Eton P1 Custom rom for mediatek MT/MTK6572 devices which are running with jellybean and kernel 3.4.5. It is a great rom with nice features.
Eton P1 Build from Stock Rom Version P1_A30.
Eton P1 Build from Stock Rom Version P1_A30.
Features: Below some features of this rom:
1. UI - Nice and Smooth
2. Rooted - Yes
3. GAAPS - Included
4. Odex - Yes
5. Dual 3G - Yes
6. Video Call - Yes
7. Chinese Apps - Removed
8. More Ram Free
And More...
Requirements:
Requirements:
Your device must be rooted and a custom recovery CWM Recovery installed in your device.
Importent: Before flash take a full backup of current rom.
Screenshot:


Credit:
MTKcROMProcess:
Reboot to Recovery Mode >
A.Wipe data/factory reset
B.Wipe cache partition
C. Mount and storage >
1. Format data
2. Format system
3. Format cache
D. Advanced >
1. Wipe dalvik cache
Back to the Main Menu.
Select
Install zip from sdcard > Choose zip from sdcard
Select Rom zip file.
Installation will start. Wait until finish.
Reboot and Enjoy Eton Rom.
Xolo A500s, Huawei Y511, ZTE V818, Symphony W82, Symphony W72, Symphony W68,
Walton Primo E2, Walton Primo F4, Karbonn Mobile, Micromax Mobile Need to port this rom.
Porting Guide:
Stock Rom (Original Rom of your device)
Port Rom (The Rom which you want to port for your device)
Step1. Delete Folders
Go to the Port Rom system folder and delete-
Folder delete:
system\etc\firmware
system\lib\hw
system\lib\modules
Step 2. Copy Files and Folders from Stock Rom to Port Rom
Go to Stock Rom folder, Copy folders and files and Paste and replace to the Port Rom.
Files and Folders to replace:
system\etc\firmware
system\etc\permissionssystem\etc\security
system\etc\wide-dhcpv6
system\etc\vold.fstab
system\etc\vold.fstab.nand
system\lib\hw
system\lib\modules
system\lib\soundfxsystem\lib\libaudio.primary.default.so
system\lib\libcamalgo.so
system\lib\libmhaldrv.so
system\lib\libcamera_client.so
system\lib\libcameracustom.so
system\lib\libcameraprofile.so
system\lib\libcameraservice.so
system\usr
system\vendor
Step 3. Edit Mount Point
Go to Port Rom META-INF\com\google\android open updater-script with Notepad++ change the mount point.
Find the line /dev/block/mmcblk0p and you will get the line like below.
format("ext4", "EMMC", "/dev/block/mmcblk0p5", "0", "/system");
mount("ext4", "EMMC", "/dev/block/mmcblk0p5", "/system");
mount("ext4", "EMMC", "/dev/block/mmcblk0p7", "/data");
Mount point I marked in red color 5 & 7 now change it as per your device mount point. (Do not need to change the whole line.) If your device mount point for system is 3 then make it 3 instead of 5. If your device mount point for data is 5 then make it 5 instead of 7. To know your device mount point run MTK Droid Root and Tools and connect your device. Then click Block Map.
Step 4. Port Kernel
Unpack stock boot.img and copy kernel then unpack port rom boot.img and paste and replace the stock kernel to custom rom kernel. Repack port boot.img. For more details follow Kernel Port Guide
Final Step: Make Rom ZIP
Now select boot, logo, system and META-INF make it zip. It is now ready for flash.
N.B. : All the Things do it at your won Risk. I will not be responsible for any kind of Brick/Damage of your phone.
Thanks for using this rom and please comments your experience about this rom.
[Guide] MTK Kernel Porting
Kernel Porting: This guide for Port MTK Kernel. Kernel porting is necessary for Rom porting. Below the guide for mediatek kernel porting.

Requirements: Requirements for the kernel porting are below:
1. Stock Rom boot.img file
2. Custom Rom boot.img file
3. QURepack Download [For Password Like my Facebook page and Message me]
Step 1: Download and Unzip QURepack: Download and Unzip QURepack. Place your Stock Rom boot.img file in QURepack folder.

Run QURepack and click Unpack.

Step 2: Copy Kernel


Requirements: Requirements for the kernel porting are below:
1. Stock Rom boot.img file
2. Custom Rom boot.img file
3. QURepack Download [
Step 1: Download and Unzip QURepack: Download and Unzip QURepack. Place your Stock Rom boot.img file in QURepack folder.
Run QURepack and click Unpack.

Step 2: Copy Kernel
Create a new folder name Stock Kernel. Copy kernel file and paste to the Stock Kernel folder.
Now click Repack button and then click New Boot File button. You will get the Stock boot.img again and delete it.

Step 3: Replace Stock Kernel to the Port Custom Rom Kernel.
Place your Custom Rom (Which you want to port) boot,img file in QURepack folder.
Click Unpack.

Copy Stock Rom kernel from Stock Kernel folder and replace to the unpacked custom rom kernel
Copy

Paste and Replace

Step 4: Repack and get new ported boot.img file
Now click Repack button and then click New Boot File button. You will get your ported kernel boot,img.

N.B. Do it at your won risk. I will not responsible for any kind of damage/brick of your phone.
UPDATE:
Update will notify here.
[Custom Rom] Amber L Lollipop Rom for MTK6572 [4.2.2]
About Amber L Rom:
Amber L Rom is based on Lollipop UI. This ROM for MT6572 and It is themed like Lollipop. This is a great rom for Jellybean users who want to make their rom like lollipop. You can feel the lollipop design in your device with this rom but it will not upgrade your kernel or your OS to Lollipop.
Amber L Rom Version is Cyanoid Version Lollipop Rom. This Amber L for Jellybean 4.2.2 Devices with MTK6572 chipset and kernel version 3.4.5. Before you want to use this for your device you have to check this things and most important thing is that you need to port this rom before use or you might brick your phone.
Everything you need to do at your won risk. I will not responsible for any find of damage or brick of your Device/Phone.
Amber L Rom Features:
1. Lollipop Look
2. New Dialer
3. New Contacts
4. New Phone Dialing logo
5. New Messaging
6. New Browser
7. New Calender
8. Tweaks Added
9. ViperFX
10. Dolby Digital
11. init.d Supported


Download Amber L lollipop Rom
Before Install:
Full Backup of your current Stock Rom before flash. Port it for your device
Requirements:
1. Rooted Phone
2. CWM Recovery
Process:
Reboot phone to Recovery Mode
A.Wipe data/factory reset
B.Wipe cache partition
C. Mount and storage >
1. Format data
2. Format system
3. Format cache
D. Advanced >
1. Wipe dalvik cache
Back to the Main Menu.
Select
Install zip from sdcard > Choose zip from sdcard
Select Rom zip file.
Installation will start. Wait until finish.
Then Reboot and Enjoy the new rom.
Credit
Rommel V.
MTKcROM for unpack and port
Custom Roms for MT6572
Symphony W85 users can flash directly this rom and other MTK6572 users such as Lenovo A369i,
Xolo A500s, Huawei Y511, ZTE V818, Symphony W82, Symphony W72, Symphony W68,
Walton Primo E2, Walton Primo F4, Karbonn Mobile, Micromax Mobile Need to port this rom.
Porting Guide:
Stock Rom (Original Rom of your device)
Port Rom (The Rom which you want to port for your device)
Step1. Delete Folders
Go to the Port Rom system folder and delete-
Folder delete:
system\etc\firmware
system\lib\hw
system\lib\modules
Step 2. Copy Files and Folders from Stock Rom to Port Rom
Go to Stock Rom folder, Copy folders and files and Paste and replace to the Port Rom.
Files and Folders to replace:
system\etc\firmware
system\etc\permissionssystem\etc\security
system\etc\wide-dhcpv6
system\etc\vold.fstab
system\etc\vold.fstab.nand
system\lib\hw
system\lib\modules
system\lib\soundfxsystem\lib\libaudio.primary.default.so
system\lib\libcamalgo.so
system\lib\libmhaldrv.so
system\lib\libcamera_client.so
system\lib\libcameracustom.so
system\lib\libcameraprofile.so
system\lib\libcameraservice.so
system\usr
system\vendor
Step 3. Edit Mount Point
Go to Port Rom META-INF\com\google\android open updater-script with Notepad++ change the mount point.
Find the line /dev/block/mmcblk0p and you will get the line like below.
format("ext4", "EMMC", "/dev/block/mmcblk0p5", "0", "/system");
mount("ext4", "EMMC", "/dev/block/mmcblk0p5", "/system");
mount("ext4", "EMMC", "/dev/block/mmcblk0p7", "/data");
Mount point I marked in red color 5 & 7 now change it as per your device mount point. (Do not need to change the whole line.) If your device mount point for system is 3 then make it 3 instead of 5. If your device mount point for data is 5 then make it 5 instead of 7. To know your device mount point run MTK Droid Root and Tools and connect your device. Then click Block Map.
Step 4. Port Kernel
Unpack stock boot.img and copy kernel then unpack port rom boot.img and paste and replace the stock kernel to custom rom kernel. Repack port boot.img. For more details follow Kernel Port Guide
Final Step: Make Rom zip file
Now select boot, logo, system and META-INF make it zip. It is now ready for flash.
N.B. : All the Things do it at your won Risk. I will not be responsible for any kind of Brick/Damage of your phone.
[QURepack] Unpack Repack boot.img [Tool MTK]
About QURepack: QURepack is a new mtk porting tool for MTK boot.img unpack/repack. You do not need to run cmd and write anything. Just run and click unpack button. This tool will help you to do this in short time.


For QURepack Password Like my Facebook page and Message me.


Special Thanks to:
Dev of bootimg

Watch: QURepack Video Tutorial
Credit:
MTKcROM
Step 1. Download and Unzip
Unzip The Zip File. You will get two exe files bootimg.exe and QURepack.exe. Place your boot.img file there.
Step 2. Unpack
Run QURepack.exe and click unpack. It will start work and you will get unpacked files.

Step 3: Repack
Click repack button and it will create two boot.img file.

Step 4: New Boot File
Now click New Boot File and you will get a new boot file.

I made this tool for personal use and make easy to unpack/repack boot image. Anyone can use this tool. If anyone want to publish this tool to their blog or website then they need to take permission.
N.B. Do it at your won risk. I will not responsible for any kind of misuse and brick or damage of your phone.
Update: Working on Update QURepack. Please write down your suggestion in comments.
When I update this tool I will notify here. Any kind of suggestion you can write in comments.
Thanks for Using. Please write a review and share your experience about this Tool in comments that I can Update this tool and add Extra features.
Special Thanks to:
Dev of bootimg
Qmobile E775 mic not working
Qmobile E775 mic no soundQmobile E775 mic jumpers
Qmobile E775 mic ic problem
Qmobile E775 mic ic ways
Qmobile E775 mic ic jumpers
Qmobile E775 mic ic not working
Qmobile E775 mic jumpers
Qmobile E775 mic ok but no sound make jumpers
Qmobile E775 mic not working problem
Qmobile E775 mic problem solution
Qmobile E775 microphone not working
Qmobile E775 microphone no sound
Qmobile E775 microphone jumpers
Qmobile E775 microphone problem solution
Qmobile E775 microphone make jumpers
download diagram image read More>>
Qmobile E775 mic not working jumpers solution
Qmobile mic ways not working

View image in large size click HERE
http://repairphone24.blogspot.com/
Qmobile E775 mic not working
Qmobile E775 mic no sound
Qmobile E775 mic jumpers
Qmobile E775 mic ic problem
Qmobile E775 mic ic ways
Qmobile E775 mic ic jumpers
Qmobile E775 mic ic not working
Qmobile E775 mic jumpers
Qmobile E775 mic ok but no sound make jumpers
Qmobile E775 mic not working problem
Qmobile E775 mic problem solution
Qmobile E775 microphone not working
Qmobile E775 microphone no sound
Qmobile E775 microphone jumpers
Qmobile E775 microphone problem solution
Qmobile E775 microphone make jumpers
Subscribe to:
Posts (Atom)